Faculty: Home/Office Recording using Echo360 Universal Capture Software
Echo360 Universal Capture allows an instructor an easy way to capture, edit, publish, and view presentations recorded on their personal computers. Instructors can use Universal Capture to capture and record their presentations in real time and post them to Echo360 so they can be viewed online via Canvas or Echo360.
Personal Capture (PCap)
Echo360 Personal Capture software reached end of life on January 15, 2020. You should uninstall it before installing Universal Capture.
Preparing to Teach Online with Echo360 Universal Capture
- Learn the basic concepts of Echo360 Universal Capture in one minute.
Video: Echo360 Universal Capture Software Overview - Using Echo360 Universal Capture - Quick Instructions
PDF: How to Install and Use Echo360 Universal Capture at CSU
Video: How to Install and Use Echo360 Universal Capture at CSU
Follow these steps to be ready to teach online with Echo360 Universal Capture for your personal PC/Laptop.
- Log in to Echo360
- Click the blue Create tab, select New Capture
- First time only: follow prompts to install software. Approve any prompts to access display, audio or camera. Software will launch when done. After initial install, selecting New Capture will launch the software.
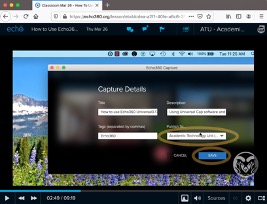
- Click Edit Capture Details and enter details so the recording can upload directly into your Echo360 Course.

Capture Details - If you omit this step, your recording will upload to your Echo360 Main Library. You can still share or assign it to a course later.
- Select what gets recorded:
- Display or screen, and if more than one, which display to capture
- Camera or web cam (USB only) to use to record yourself speaking
- Audio or which mic to use to record your audio.
- Confirm you see green bars moving up and down in the audio indicator.
- No indicator bars? Go to your System Settings and activate a mic.
- Some webcams have mics as well. Do select the audio you prefer.
- Headsets work the best.
- If using onboard, or system mic, turn speakers off or way down to avoid feedback and echo.
- Press the Red Record Button
 in the bottom middle. Make a 5 minute test recording.
 - Press pause or stop, watch it upload to your library.
- Go to your Echo360 Library, wait until the thumbnail changes from Processing to the completed and named video.
- Hover over completed thumbnail, and in the bottom right corner, tap blue box with three white dots, or ellipse. Select View to watch the video and confirm all is working.
- Make adjustments to your settings if necessary.
NOTE: You students will engage successfully with 5 to 10 minute segments by topic, rather than an hour long lecture. Reimagine how your topics can spring to life when split into bite-sized recordings. Consider Intro, topic background or prerequisite refresher, main topic, sub topics, application of topic, maybe a conclusion. All this can be easily started and stopped to create several recordings with Echo360 Universal Capture.
Related Resources
- Request an Echo360 course section. (All Banner courses are automatically created, but sections are not.)
Video: Request Echo360 Scheduled and Universal Capture Semester Recording Sections - Launch Echo360 Universal Capture, and click log in.
Important:- Always log in to the Echo360.org site with firstname.lastname@colostate.edu.
- On the CSU Login Page, use your NetID username and password.
- Before beginning your recording,
- Open Edit Capture Details.
- Add a Title.
- In the Publish to section field, select the course section where you will be sending this video.
** If you leave the this field on the default ("Library"), you will need to get an Echo360 admin involved to retrieve your video.
- Always log in to the Echo360.org site with firstname.lastname@colostate.edu.
- Sharing Videos from your Library
- Edit Echo360 Recordings
- Link Echo360 to your Canvas course section. There are two steps.